
This cherry cheesecake was made with the bountiful cherry harvest that we have been blessed with this year. It has a crisp crust, with a cherry and soft cheese filling, and drizzled with cherry syrup and melted white chocolate on top. A truly summery, fruity dessert.

My cherry tree has been through a lot over the years. At one point it was ravaged by bugs so much that I was worried that we might have to do away with it. But, fortunately, it responded well to the nurture and care, and fought its way through. For the last few years, it has been slowly trying to get back its vigour. After fruiting in dribs and drabs, this year has been the best harvest yet. It is quite heartening to see the shiny little fruits dangling like jewels from the little tree.
The cherries-
The cherries that I used from our tree are on the smaller side and quite tart. Rather than having them on their own, they are better off being cooked and added to dishes to add their colour and flavour. So, I’ve been doing that. You can use regular sweet cherries in this recipe too. The cooking time for the cherries may differ a bit, so do keep an eye. When the juices thicken slightly, and the fruit is soft, it’s time to come off the heat. If your cherries are too sweet, you can also reduce the amount of sugar in the cheesecake.

Pitting the cherries-
My cherries are quite small and I found it easier to take the stones out after they were cooked. If yours are bigger, you can pit them before cooking.

Storing-
Keep any leftovers covered in the fridge.

Baking pan-
I used a 10 inch round pan which is 1 and 1/2 inches deep. You can use different sized pans too. If you are using a narrower, deeper pan reduce the amount of crust a little. Bake the crust for the same period of time. For the rest of the cheesecake, use same quantities and follow the instructions in the recipe. Look for the signs that will tell you when the cheesecake is ready. A deeper pan will probably need a bit more time. But ovens do vary, so do keep an eye on it.

Texture-
The texture of this cheesecake is on the softer side; almost mousse-like. Make sure you follow the instructions for cooling and chilling the cheesecake and don’t be tempted to cut into it before that.

Continue reading for the full and printable recipe for this delicious cherry cheesecake.
All the non vegetarian recipes on this website can be found here.
You might also like to try the following recipes from this website-
Subscribe to Sunita’s World – life and food! to receive updates on latest posts, tips and recommendations straight to your inbox! Simply fill in the details below. Thank you!
Recipe card-
Vanilla cheesecake
Ingredients
Crust
- 250 gms digestive biscuits, crushed into slightly coarse crumbs
- 1 tsp sugar
- 7-8 tbsp melted butter
For the filling
- 600 gms soft cheese (full fat)
- ¾ cup caster sugar
- 3 eggs
- 2 tsp vanilla extract
To serve
- a little melted dark chocolate
- a quenelle of thickly whipped double cream (optional)
Instructions
The crust-
- Pre heat the oven at 200 deg C.
- Grease the bottom and sides of a baking pan. (I used a 10 inch diameter pan which is 1½ inches deep. See notes)
- Mix together all the ingredients for the crust.
- Transfer the mixture to the pan and firmly and evenly press it over the bottom.
- Place the pan in the centre of the oven and bake for 10 minutes.
- Remove the pan from the oven and place on a rack to cool completely.
The filling and baking the cheesecake-
- Pre heat the oven at 120 deg C.
- In a bowl, beat together the soft cheese and sugar with an electric whisk till smooth.
- Beat in the eggs, one at a time, until well incorporated. Do not overmix.
- Whisk in the vanilla.
- Tip the filling over the crust and smooth the top.
- Place the pan in the centre of the pre heated oven and bake for 55-60 minutes or till the centre of the cheesecake is slightly wobbly when the pan is shaken gently.
- Switch off the oven.
- Leave the cheesecake inside the oven and keep the oven door slightly ajar. Let the cheesecake cool completely.

- Cover the pan with plastic wrap and chill in the fridge for 6-8 hours or overnight.
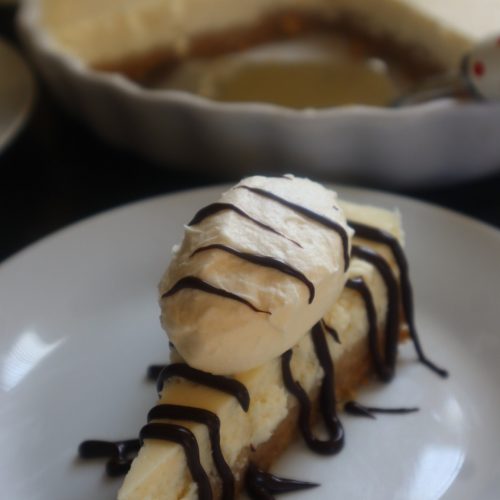
To serve-
- Cut a wedge from the cheesecake and place on a plate.
- Drizzle some melted white chocolate followed by a quenelle of thickly whipped double cream (optional-*** see notes below).

Video
Notes
- If you are using a narrower, deeper pan reduce the amount of crust a little. Bake the crust for the same period of time. For the rest of the cheesecake, use same quantities and follow the instructions in the recipe. Look for the signs that will tell you when the cheesecake is ready. A deeper pan will probably need a bit more time. But ovens do vary, so do keep an eye on it.
- ***I had some leftover double cream that I need to use up, so whipped it and added as a topping to the cheesecake. Personally, I felt it made the cheesecake a little heavy, although the rest of the family indulged in it. So please use your discretion.
All my baking recipes can be found here.
You might also like to try the following recipes-

Until next time-
Sunita
STAY CONNECTED: